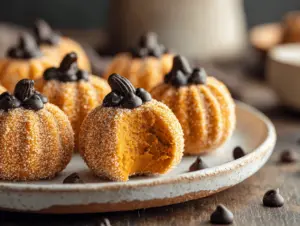
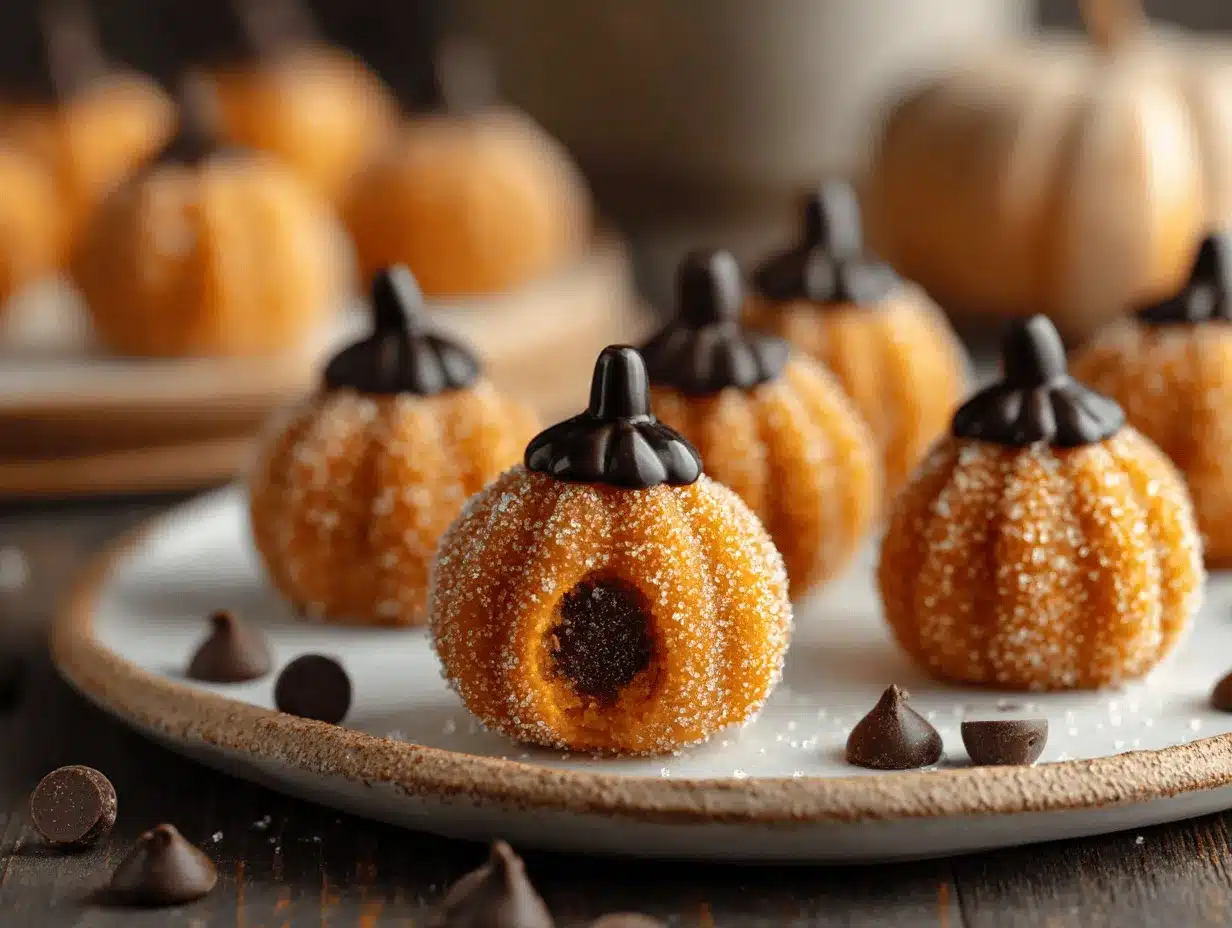
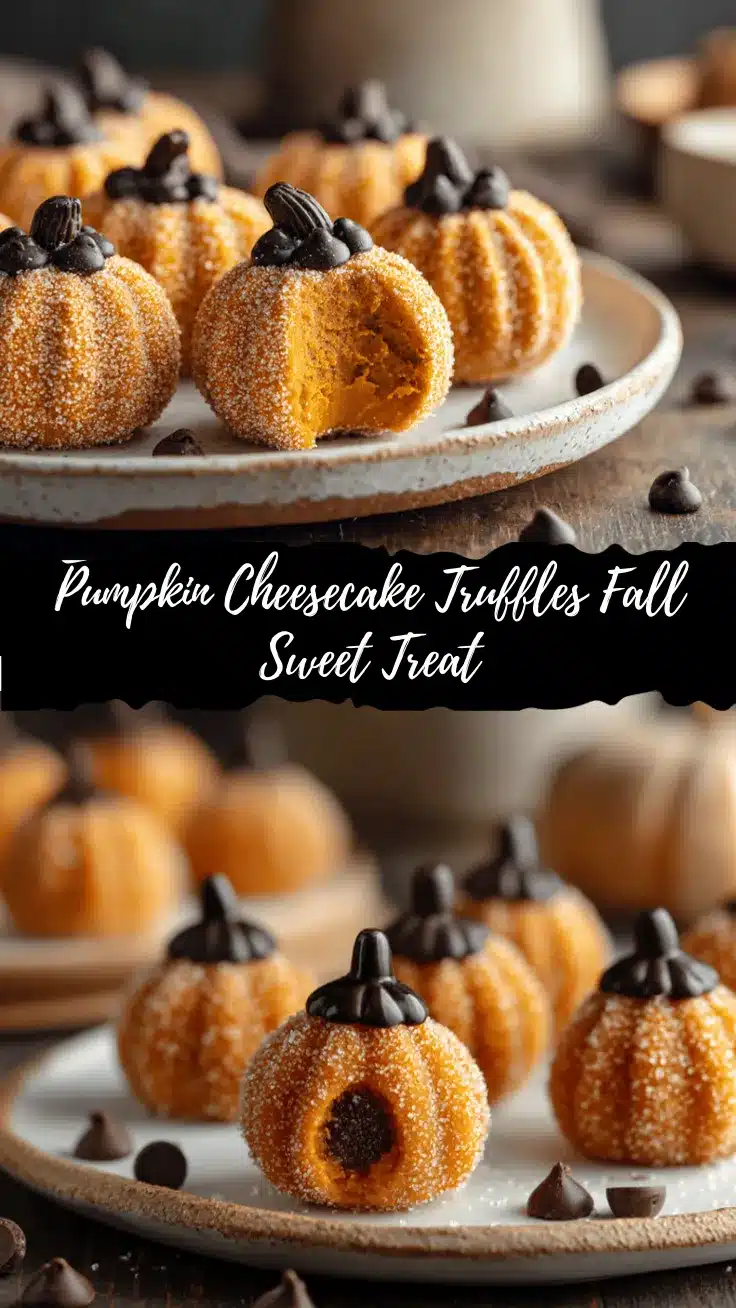
Picture this: creamy, dreamy pumpkin cheesecake truffles with just the right hint of spice, wrapped in a blanket of white chocolate and finished with a sprinkle of cinnamon. The first time I made these pumpkin cheesecake truffles, my kitchen smelled like a cozy October morning. (Honestly, if you could bottle up the scent of fall, this would be it!) I stumbled on the idea when I wanted something festive for Halloween but didn’t want to mess with a hot oven or complicated baking.
Pumpkin cheesecake truffles are my go-to for family gatherings, Halloween parties, or just as a sweet treat after dinner. They’re bite-sized, no-bake, and so simple—yet they taste like you spent hours fussing over them. If you love all things pumpkin spice and crave that silky cheesecake tang, these little morsels will be your new obsession. Plus, they’re a total lifesaver when you need a quick, make-ahead dessert that everyone raves about. Even my pickiest eater (my youngest kid) asks for seconds!
After testing this recipe more times than I can count (seriously, my freezer has been truffle central), I’ve dialed in the perfect balance of pumpkin, spices, and cream cheese. As a lifelong cheesecake fan and pumpkin devotee, I can honestly say these pumpkin cheesecake truffles check every box—flavor, texture, and pure autumn joy. Whether you’re a busy parent, a college student with a sweet tooth, or someone who just loves quick, festive treats, you need to try this recipe.
Why You’ll Love This Pumpkin Cheesecake Truffles Recipe
- Quick & Easy: No oven, no water bath, no fuss. These truffles come together in about 30 minutes, plus a chill in the freezer. Perfect for when you want a homemade treat without spending all day in the kitchen.
- Simple Ingredients: There’s nothing fancy or hard-to-find here. You probably have most of these ingredients on hand—especially if you’re a pumpkin spice fan!
- Perfect for Fall & Halloween: With their vibrant orange hue and warm spices, these truffles are a showstopper on any autumn dessert table. They’re a go-to for Halloween parties and Thanksgiving spreads alike.
- Crowd-Pleaser: Every time I bring these out, they disappear in minutes. Kids love the sweet, creamy center, and adults appreciate the not-too-sweet cheesecake tang.
- Unbelievably Delicious: Cream cheese and pumpkin combine for a silky-smooth, melt-in-your-mouth filling, all wrapped up in a crisp chocolate shell. It’s like pumpkin pie and cheesecake had a magical baby.
What really sets this pumpkin cheesecake truffles recipe apart is how easy it is to adapt. I blend the filling until silky smooth, chill it just right so it’s easy to roll, and dip each one in a generous coating of chocolate. I’ve tried other recipes that were either too sweet, too soft, or just bland. This one gets it just right every time—the spices shine, the pumpkin is present (but not overpowering), and the texture is spot-on.
This recipe is more than just a seasonal treat—it’s a way to bring a little bit of autumn magic into your day. I love making these with my kids, letting them sprinkle on the cinnamon or drizzle extra chocolate. It’s comfort food, but with a fun, festive twist. Trust me: make a batch, and you’ll see why my friends beg me for the recipe every fall!
What Ingredients You Will Need
This recipe uses simple, wholesome ingredients to deliver the bold flavor and creamy texture that makes pumpkin cheesecake truffles so special. Most of these are pantry staples, and you can easily swap in alternatives if needed. Here’s what you’ll need:
- Cream Cheese (8 oz/225g, softened): The foundation of that creamy, tangy filling. I always use full-fat Philadelphia for the best texture, but any block-style cream cheese works. Make sure it’s softened for easy mixing!
- Pumpkin Puree (1/2 cup/120g): Use pure pumpkin, not pumpkin pie filling. I love Libby’s, but homemade puree works too—just drain off any extra liquid.
- Graham Cracker Crumbs (1 cup/100g): These add structure and a hint of toasty flavor. For a gluten-free version, use GF graham crackers or even crushed gingersnaps for a spicy kick.
- Powdered Sugar (3/4 cup/90g): Makes the filling sweet and smooth. You can sift it if you want extra silkiness, but I usually just toss it in.
- Pumpkin Pie Spice (2 teaspoons): The classic autumn spice blend! If you’re out, use 1 teaspoon cinnamon, 1/4 teaspoon nutmeg, 1/4 teaspoon ginger, and a pinch of cloves.
- Vanilla Extract (1 teaspoon): Rounds out the flavor—don’t skip it!
- White Chocolate Chips or Melting Wafers (12 oz/340g): For dipping. Ghirardelli or Merckens are my favorites because they melt smoothly. If you prefer, use milk or dark chocolate for a flavor twist.
- Coconut Oil or Shortening (1 tablespoon): Optional, but helps the chocolate melt smooth and coat evenly.
- Ground Cinnamon or Pumpkin Pie Spice (for sprinkling): Totally optional, but adds a pretty finish and extra flavor on top.
Substitution tips: Swap graham crackers for gingersnaps or vanilla wafers for a slightly different flavor. Use dairy-free cream cheese and chocolate to make these vegan. If you want a lower-carb version, try almond flour instead of graham crackers—just note the texture will be a bit different. Don’t be afraid to get creative; the base recipe is super forgiving!
Equipment Needed
- Mixing Bowl: A medium or large bowl for stirring up your filling. I like to use a glass one so I can see when everything’s fully mixed.
- Electric Mixer or Hand Mixer: This makes the filling silky smooth, but you can use a stiff spatula and some elbow grease if that’s all you have.
- Measuring Cups and Spoons: For accuracy—especially for the pumpkin and spices.
- Baking Sheet: To chill the truffles. Line it with parchment paper for easy cleanup.
- Cookie Scoop (1-inch): Helps portion out perfect, bite-sized truffles. If you don’t have one, two spoons work just fine—it’s a little messier, but hey, that’s half the fun.
- Microwave-Safe Bowl or Double Boiler: For melting the chocolate. I usually use a glass measuring cup in the microwave, stirring every 30 seconds.
- Fork or Dipping Tool: To help dip truffles into the chocolate without making a giant mess (though, I still get a little chocolate on my fingers every time).
- Parchment Paper: Keeps the truffles from sticking and makes cleanup a breeze.
If you don’t have a mixer, a sturdy whisk or spatula works—it just takes a bit more muscle. For the chocolate, I’ve used both the microwave and a stovetop double boiler—both work, but be sure not to overheat your chocolate. Budget tip: Dollar store cookie scoops and bowls work just as well as fancy brands, and they’re easy to replace if you lose one in the back of a cabinet (guilty as charged).
How to Make Pumpkin Cheesecake Truffles
- Combine the Filling Ingredients: In a large mixing bowl, beat together 8 oz (225g) softened cream cheese and 1/2 cup (120g) pumpkin puree using an electric mixer on medium speed until fully combined and smooth—about 1-2 minutes. It should look creamy and fluffy. If you see lumps, just keep mixing!
- Add the Dry Ingredients: Add 1 cup (100g) graham cracker crumbs, 3/4 cup (90g) powdered sugar, 2 teaspoons pumpkin pie spice, and 1 teaspoon vanilla extract. Mix on low speed until everything is evenly incorporated. The mixture will be thick but sticky—kind of like a soft cookie dough. If it’s too loose to roll, add an extra tablespoon of graham crumbs at a time until it firms up.
- Chill the Filling: Cover the bowl with plastic wrap and refrigerate for at least 1 hour. The filling needs to chill so it’s easy to roll into balls. If you’re in a hurry, pop it in the freezer for 20-30 minutes (just don’t forget about it!).
- Shape the Truffles: Once the filling is chilled and firm, use a 1-inch cookie scoop (or two spoons) to scoop out about 1 tablespoon (15g) of mixture per truffle. Roll between your palms to make smooth balls. Place each one on a parchment-lined baking sheet.
- Freeze the Truffles: Place the baking sheet in the freezer for 30 minutes. This helps the truffles hold their shape when you dip them in warm chocolate. If you skip this, they might fall apart or melt in the chocolate!
- Melt the Chocolate: In a microwave-safe bowl, combine 12 oz (340g) white chocolate chips (or melting wafers) with 1 tablespoon coconut oil or shortening. Microwave in 30-second bursts, stirring between each, until smooth and glossy—usually about 1-2 minutes. If using a double boiler, melt gently over simmering water, stirring constantly.
- Dip the Truffles: Working quickly, drop each frozen truffle into the melted chocolate. Use a fork or dipping tool to lift it out, letting excess chocolate drip off. Place back on the parchment. If the chocolate starts to thicken, warm it up again for 10–15 seconds.
- Decorate: While the chocolate is still wet, sprinkle each truffle with a pinch of ground cinnamon or extra pumpkin pie spice for a pretty finish. You can also drizzle a little melted dark chocolate over the top for contrast.
- Let Set & Serve: Let the truffles sit at room temperature or pop them in the fridge for 10-15 minutes until the chocolate is firm. Transfer to a serving plate and enjoy! Store extras in an airtight container in the fridge.
Troubleshooting tips: If the filling is too soft to roll, add more graham crumbs; if it’s too stiff, add a splash of pumpkin puree. If your chocolate seizes or gets thick, stir in a bit more coconut oil. And don’t worry if your truffles aren’t perfectly round—they’ll taste just as good!
Pro Cooking Tips & Techniques
- Keep Ingredients Cold: Cold cream cheese and a quick chill for the filling make rolling much easier. If your hands get warm, rinse them in cold water before rolling more truffles—this keeps them from getting sticky.
- Use Good-Quality Chocolate: Not all white chocolate chips melt the same. Cheaper brands can seize up or turn grainy. I’ve learned the hard way—if you want a flawless coating, splurge on melting wafers or a reputable chocolate brand.
- Don’t Over-Mix the Filling: Once everything comes together, stop mixing. Over-mixing can make the filling runny, especially if your kitchen is warm.
- Work in Batches: If you’re making a double batch (which I highly recommend for parties), keep half the truffles in the freezer while you dip the others. This way, they stay firm and won’t fall apart in the chocolate.
- Chocolate Dipping Tricks: Use a fork for dipping and tap gently on the side of your bowl to shake off extra chocolate. Place dipped truffles back onto parchment for easy removal (wax paper works too, but parchment is my favorite).
- Personal Lesson Learned: Once, I tried to skip chilling the truffles before dipping—bad idea! They turned into a sticky mess. Always freeze before dipping for the best results.
Consistency is key with pumpkin cheesecake truffles—don’t rush the chilling steps. And if you’re multitasking (like making dinner while truffling), set a timer so nothing gets forgotten in the freezer. These little nuggets are forgiving, but a bit of patience pays off big time!
Variations & Adaptations
- Gluten-Free: Swap out the graham cracker crumbs for gluten-free gingersnaps, GF graham crackers, or even almond flour. The texture changes slightly, but the flavor is still amazing.
- Vegan Version: Use dairy-free cream cheese (like Kite Hill or Tofutti) and vegan white chocolate chips. Sub coconut oil for butter if needed. I’ve made this for vegan friends, and they couldn’t believe how close it tasted to the original!
- Flavor Swaps: Want a spicier kick? Add a pinch of cayenne or extra ginger. For a more decadent bite, dip in dark or milk chocolate instead of white. You can also stir mini chocolate chips into the filling for extra texture.
- Seasonal Touches: Roll the finished truffles in crushed pecans, toasted coconut, or orange candy melts for Halloween flair. For Thanksgiving, add a drizzle of caramel on top.
- Personal Spin: Sometimes I divide the filling and add chopped dried cranberries to half for a tart twist. It’s so good with the creamy pumpkin base!
You can also adjust the sweetness—add more or less powdered sugar to taste. If nut allergies are a concern, stick with graham crackers and avoid almond flour. The recipe is flexible, so make it fit your pantry and preferences!
Serving & Storage Suggestions
Serve pumpkin cheesecake truffles chilled or at cool room temperature for the best creamy texture. Arrange them on a festive plate, sprinkle with extra cinnamon, or pop them into mini cupcake liners for a Pinterest-worthy display. These pair beautifully with hot apple cider, pumpkin spice lattes, or a simple cup of tea.
Store leftovers in an airtight container in the refrigerator for up to 1 week. If you want to make them ahead, freeze the undipped truffles for up to 2 months—just thaw in the fridge, then dip in chocolate before serving. Once coated, they can also be frozen, but the chocolate shell may lose a bit of its snap after thawing (still delicious, though!).
To reheat (if you like a gooey center), let sit at room temp for 10–15 minutes before serving. The flavors deepen after a day or two in the fridge—the spices and pumpkin meld together for an even richer taste. Honestly, they taste just as good on day five as they do on day one (if they last that long!).
Nutritional Information & Benefits
Each pumpkin cheesecake truffle contains approximately 120 calories, 7g fat, 12g carbs, and 2g protein (values will vary based on exact brands and size). These little bites are rich, so a few go a long way!
Pumpkin is loaded with vitamin A, fiber, and antioxidants. Cream cheese brings calcium and a bit of protein to the mix. For a lighter version, use reduced-fat cream cheese or a sugar substitute—just keep in mind the texture may shift. Allergens include dairy and gluten (unless you use the adaptations above).
From my own wellness journey, I love that these truffles satisfy a sweet tooth with built-in portion control. You get all the cozy autumn flavor in a couple of bites. That’s a win in my book!
Conclusion
If you’re searching for a quick, delicious, and downright festive fall treat, you can’t go wrong with these pumpkin cheesecake truffles. They’re perfect for Halloween parties, Thanksgiving desserts, or just cozying up with a good book and a mug of cider. Make them your own—add a drizzle, swap the chocolate, or mix in some nuts.
I love the way this recipe brings people together and sparks conversation (“Wait, these are no-bake?!”). Give them a try, and I bet they’ll become a staple in your autumn dessert lineup. If you make a batch, share your tweaks and tag me—I’d love to see your creative spins!
Happy truffle-making, and may your fall be filled with sweet, spiced memories!
Frequently Asked Questions About Pumpkin Cheesecake Truffles
How far in advance can I make pumpkin cheesecake truffles?
You can make them up to a week ahead if stored in the fridge. Or freeze the undipped truffles for up to two months, then dip in chocolate before serving.
Can I use pumpkin pie filling instead of puree?
I wouldn’t recommend it—pumpkin pie filling is already sweetened and spiced, which throws off the balance. Stick with pure pumpkin puree for the best flavor and texture.
What’s the best way to melt chocolate for dipping?
I like the microwave method: heat in 30-second bursts, stirring each time. You can use a double boiler if you prefer—just don’t let water get in the chocolate, or it might seize.
My filling is too soft to roll—what can I do?
Just add a little more graham cracker crumbs (about a tablespoon at a time) until it firms up. Make sure to chill the filling before rolling, too!
Are these pumpkin cheesecake truffles gluten-free?
They can be! Simply use gluten-free graham crackers (or gingersnaps) in place of regular ones. The rest of the ingredients are naturally gluten-free.
Pin This Recipe!
Pumpkin Cheesecake Truffles
- Total Time: 1 hour 30 minutes
- Yield: 24 truffles 1x
Description
These easy, no-bake pumpkin cheesecake truffles combine creamy pumpkin spice cheesecake filling with a crisp white chocolate shell for the ultimate fall treat. Perfect for Halloween, Thanksgiving, or any autumn gathering, they’re quick to make and always a crowd-pleaser.
Ingredients
- 8 oz (225g) cream cheese, softened
- 1/2 cup (120g) pumpkin puree (not pumpkin pie filling)
- 1 cup (100g) graham cracker crumbs
- 3/4 cup (90g) powdered sugar
- 2 teaspoons pumpkin pie spice
- 1 teaspoon vanilla extract
- 12 oz (340g) white chocolate chips or melting wafers
- 1 tablespoon coconut oil or shortening (optional, for melting chocolate)
- Ground cinnamon or pumpkin pie spice, for sprinkling (optional)
Instructions
- In a large mixing bowl, beat together the softened cream cheese and pumpkin puree with an electric mixer on medium speed until smooth and creamy, about 1-2 minutes.
- Add graham cracker crumbs, powdered sugar, pumpkin pie spice, and vanilla extract. Mix on low speed until fully combined. The mixture should be thick and sticky. If too loose, add more graham crumbs a tablespoon at a time.
- Cover the bowl and refrigerate the filling for at least 1 hour, or freeze for 20-30 minutes until firm.
- Once chilled, use a 1-inch cookie scoop or two spoons to portion about 1 tablespoon of filling per truffle. Roll into smooth balls and place on a parchment-lined baking sheet.
- Freeze the truffles for 30 minutes to firm up before dipping.
- In a microwave-safe bowl, combine white chocolate chips (or melting wafers) with coconut oil or shortening. Microwave in 30-second bursts, stirring between each, until melted and smooth (about 1-2 minutes). Alternatively, melt over a double boiler.
- Working quickly, dip each frozen truffle into the melted chocolate using a fork or dipping tool. Let excess chocolate drip off, then return to the parchment-lined sheet.
- While the chocolate is still wet, sprinkle each truffle with ground cinnamon or extra pumpkin pie spice. Optionally, drizzle with melted dark chocolate for contrast.
- Let truffles set at room temperature or refrigerate for 10-15 minutes until the chocolate is firm. Serve chilled or at cool room temperature. Store leftovers in an airtight container in the fridge.
Notes
For gluten-free truffles, use gluten-free graham crackers or gingersnaps. Vegan versions can be made with dairy-free cream cheese and vegan white chocolate. If the filling is too soft, add more graham crumbs; if too stiff, add a splash of pumpkin puree. Always chill the filling and freeze the truffles before dipping for best results. Store in the fridge for up to 1 week or freeze undipped truffles for up to 2 months.
- Prep Time: 20 minutes
- Cook Time: 0 minutes
- Category: Dessert
- Cuisine: American
Nutrition
- Serving Size: 1 truffle
- Calories: 120
- Sugar: 9
- Sodium: 60
- Fat: 7
- Saturated Fat: 4
- Carbohydrates: 12
- Protein: 2
Keywords: pumpkin cheesecake truffles, no bake pumpkin dessert, fall treats, Halloween dessert, Thanksgiving truffles, pumpkin spice, easy truffles, white chocolate truffles