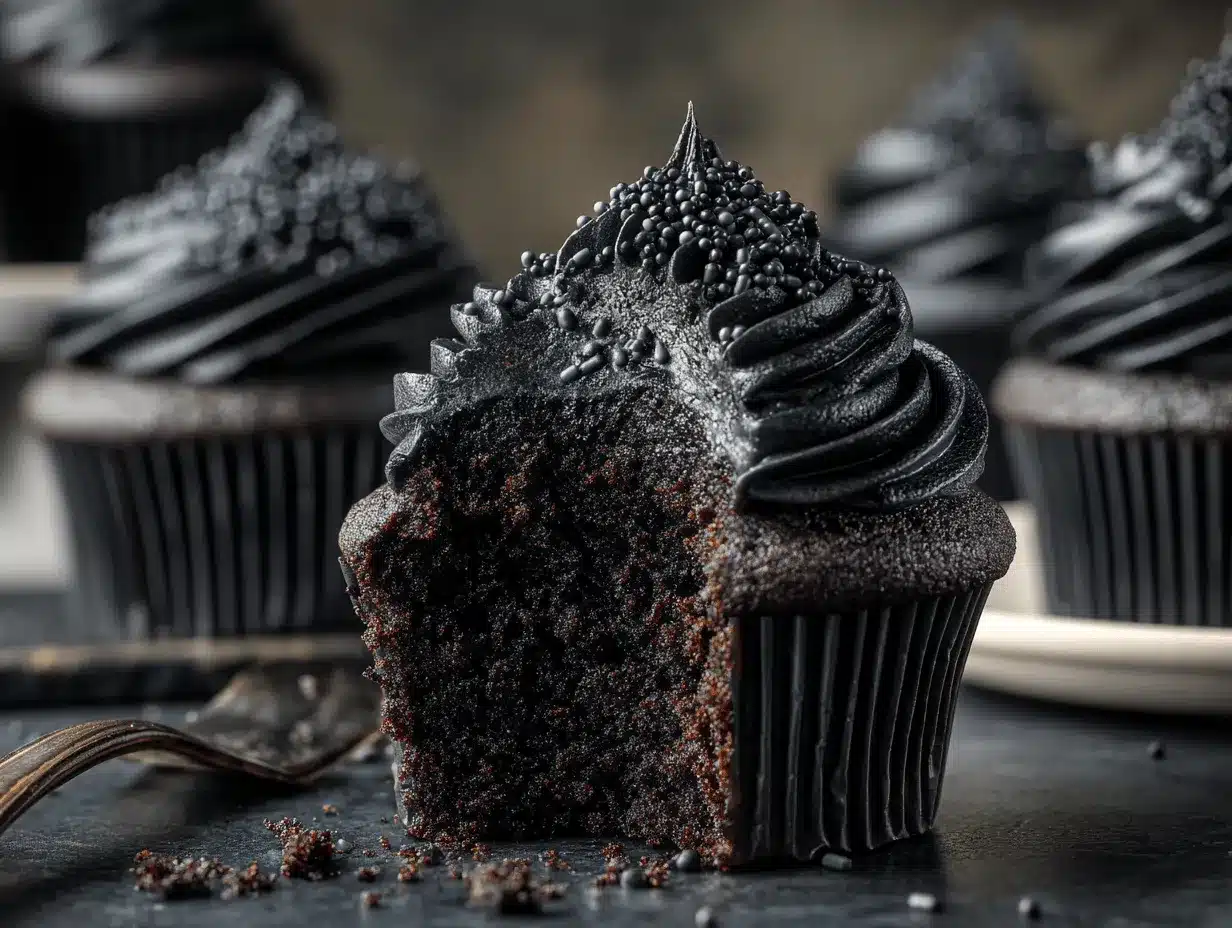
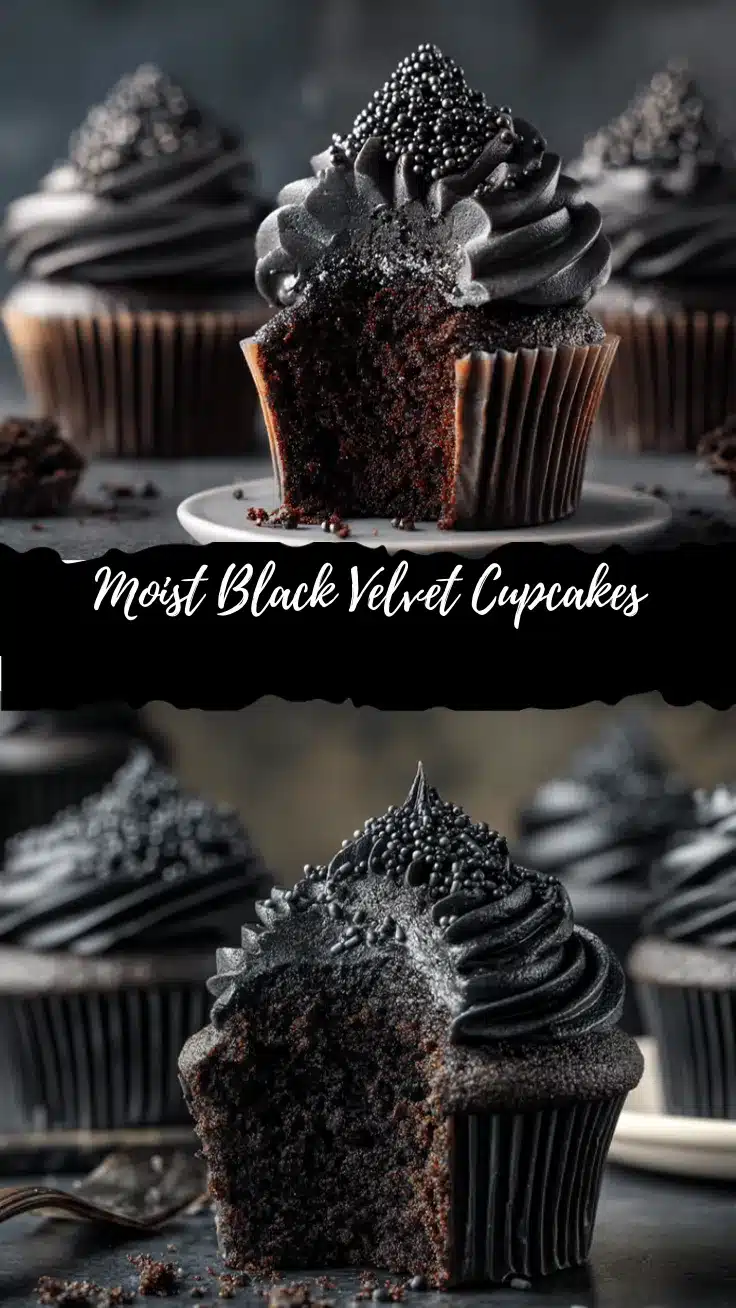
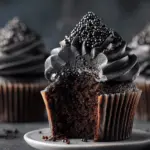
One bite of these black velvet cupcakes and you’ll understand why I’m totally obsessed. The deep, inky color is so striking—almost like a dessert straight out of a fairy tale. But honestly, it’s the texture that really gets me every time: unbelievably moist, soft, and just the right amount of rich. I first whipped these up for a Halloween get-together, but they instantly stole the show and have been on repeat ever since. There’s just something magical about a treat that looks mysterious but tastes so classic and comforting. Whether you’re a dark chocolate fan or just want to wow your dinner party guests, these black velvet cupcakes check every box.
I’ve tested this recipe more times than I can count (my kids don’t complain about the taste-testing, trust me). It’s become my go-to whenever I want something a little dramatic but still easy enough for a weeknight bake. The secret? A blend of black cocoa powder and regular Dutch-processed cocoa, which gives that signature dark color and a flavor that’s deeper than regular chocolate cake. Plus, a splash of buttermilk keeps every crumb tender. If you’re looking for an easy, show-stopping dessert that never disappoints, these black velvet cupcakes are it. Great for parties, birthdays, or just because you want something a little moody and mysterious with your coffee. Let’s get baking!
Why You’ll Love This Black Velvet Cupcakes Recipe
- Quick & Easy: These cupcakes come together in about 35 minutes—no fancy techniques, just simple steps.
- Simple Ingredients: Everything you need is probably in your pantry right now—nothing wild or hard to pronounce.
- Perfect for Parties: The intense dark color is absolutely made for Halloween, birthdays, or when you want to impress friends at a potluck.
- Crowd-Pleaser: Even picky eaters can’t resist the soft crumb and the creamy frosting. Kids love the color, adults love the flavor.
- Unbelievably Delicious: Deep chocolate flavor, super moist texture, and a hint of tang from the buttermilk—this is comfort food with an edge.
What sets these black velvet cupcakes apart from your regular chocolate cupcakes? It’s all about the cocoa combination and that perfect moisture balance. I blend black cocoa (think Oreo cookie level-dark) with Dutch-processed cocoa, so you get a dramatic look and a chocolate flavor that’s smooth but bold. The buttermilk and a touch of oil keep things ultra-moist, so every bite is soft, never dry. Honestly, I tried several versions before landing on this one—one batch was too dense, another wasn’t dark enough, but this version? Pure cupcake magic.
There’s a reason these cupcakes make people pause and ask, “Wait, what’s in these?” They’re the kind of bake that makes you close your eyes and savor. And it’s not just about looks—the taste is unforgettable. Whether you want to spoil yourself or blow your friends away with something totally unique, these black velvet cupcakes deliver every time. Easy, reliable, and just a little mysterious—they’re my not-so-secret weapon for dessert success!
What Ingredients You Will Need
This recipe uses simple, honest ingredients to create a dramatic, moist cupcake that tastes as good as it looks. Most of these should be familiar pantry staples, but a couple of special touches really make the difference!
- For the Cupcake Batter:
- All-purpose flour (bleached or unbleached, both work fine)
- Black cocoa powder (for that signature color and Oreo-like flavor; I love King Arthur brand)
- Dutch-processed cocoa powder (adds depth; use Rodelle or Hershey’s Special Dark)
- Granulated sugar (for sweetness and structure)
- Baking powder (helps the cupcakes rise nice and fluffy)
- Baking soda (works with buttermilk for extra lift)
- Salt (balances the sweetness and deepens chocolate flavor)
- Buttermilk (room temperature; gives moisture and a slight tang—substitute with yogurt thinned with milk if needed)
- Vegetable oil (keeps the crumb soft; can swap for melted coconut oil for a hint of flavor)
- Large eggs (room temperature; binds everything together)
- Pure vanilla extract (look for real vanilla for best flavor)
- Hot water or hot coffee (brings out the cocoa flavor and helps dissolve everything nicely—coffee adds even more depth!)
- For the Frosting:
- Unsalted butter (softened; I usually use Kerrygold for richness)
- Cream cheese (softened; optional, but makes frosting extra creamy)
- Powdered sugar (sifted, for that silky finish)
- Black cocoa powder (for color and flavor—could use just a little, or skip for classic cream cheese frosting)
- Milk or heavy cream (to adjust the frosting consistency)
- Pinch of salt (optional, but balances the sweetness)
Ingredient Tips: If you can’t find black cocoa, add a little more Dutch-processed cocoa, but the cupcakes won’t be as dark (still tasty, though!). For a gluten-free version, I’ve had good luck with King Arthur’s Measure for Measure flour. And if you want to make these dairy-free, swap buttermilk for unsweetened almond milk soured with a splash of lemon juice, and use vegan butter and cream cheese in the frosting. These cupcakes are surprisingly forgiving—just don’t skip the cocoa combo if you want that true black velvet look!
Equipment Needed
- Muffin tin (12-cup standard size): Nonstick is great, but any sturdy pan works. I’ve used my old scratched-up tin and it still does the job.
- Paper cupcake liners: Makes cleanup a breeze and adds a festive touch; you can go with plain white or pick something bold for parties.
- Large mixing bowls: At least two—one for wet, one for dry ingredients.
- Whisk and rubber spatula: Whisk for blending dry and wet ingredients, spatula for folding and scraping.
- Electric mixer or stand mixer (optional): Not strictly necessary, but very helpful for the frosting. A handheld mixer works just fine.
- Measuring cups and spoons: Both dry and liquid sets make things accurate. I’m all about leveling off with the back of a butter knife—old school!
- Cooling rack: Letting the cupcakes cool fully prevents soggy bottoms.
- Piping bag and large round or star tip (optional): For a pretty swirl of frosting; a zip-top bag with the corner snipped will do in a pinch.
If you don’t have a muffin tin, you can use oven-safe ramekins or even bake the batter as a mini cake. For the frosting, a sturdy wooden spoon will work if you don’t have a mixer—just a little extra elbow grease needed. And if your cupcake liners tend to stick, try lightly spritzing them with nonstick spray first (learned that the hard way!). Budget tip: Dollar store muffin tins and mixing bowls totally get the job done.
How to Make Black Velvet Cupcakes (Step-by-Step)
-
Prep the oven and tin:
- Preheat your oven to 350°F (175°C).
- Line a standard 12-cup muffin tin with cupcake liners.
Tip: Don’t skip the preheat! A hot oven gives you that perfect domed cupcake top.
-
Mix dry ingredients:
- In a large bowl, whisk together 1 cup (125g) all-purpose flour, 1/3 cup (30g) black cocoa powder, 2 tbsp (15g) Dutch-processed cocoa powder, 1 cup (200g) granulated sugar, 1 tsp (4g) baking powder, 1/2 tsp (2g) baking soda, and 1/2 tsp (3g) salt.
Make sure there are no cocoa lumps—it should look evenly dark and powdery.
-
Combine wet ingredients:
- In another bowl, whisk 1/2 cup (120ml) buttermilk, 1/3 cup (80ml) vegetable oil, 2 large eggs (room temp), and 2 tsp (10ml) vanilla extract until well blended.
The mixture will look pale and slightly thick—totally normal.
-
Combine wet and dry:
- Pour the wet ingredients into the dry ingredients.
- Stir gently with a spatula until just combined—do not overmix!
Batter may look a little lumpy; that’s okay. Overmixing makes cupcakes tough (learned that the hard way—trust me!).
-
Add hot water/coffee:
- Add 1/2 cup (120ml) hot water or hot brewed coffee and stir gently until the batter is smooth and glossy.
This is when the magic happens—the batter goes from thick to slightly runny and very dark.
-
Fill liners:
- Divide the batter evenly among the 12 cupcake liners (about 2/3 full each).
I usually use an ice cream scoop for less mess. If you overfill, the cupcakes may overflow.
-
Bake:
- Bake for 17-20 minutes, or until a toothpick inserted in the center comes out with a few moist crumbs.
The tops should spring back lightly when pressed. Don’t wait for the toothpick to come out totally clean—overbaked cupcakes get dry fast.
-
Cool completely:
- Let cupcakes cool in the pan for 5 minutes, then move to a wire rack to cool fully before frosting.
Warm cupcakes will melt your frosting—patience pays off!
-
Make frosting:
- Beat 1/2 cup (115g) unsalted butter (softened) and 4 oz (113g) cream cheese (softened, optional) until creamy.
- Gradually add 2-2.5 cups (240-300g) powdered sugar and 1-2 tbsp (8g) black cocoa powder (if using), beating until fluffy.
- Add 1-2 tbsp (15-30ml) milk or cream as needed for smoothness; beat in 1 tsp vanilla and a pinch of salt.
Frosting should be spreadable but hold peaks. If it’s too stiff, add a drop more milk; too runny, add more sugar.
-
Frost and decorate:
- Once cupcakes are cool, pipe or spread frosting generously on top.
- Decorate as you wish—sprinkles, edible glitter, or even a dusting of extra cocoa look gorgeous!
There you go—dramatic, moist, and easy black velvet cupcakes! If you notice sinking centers, they may be underbaked; if they’re dry, check your baking time and oven temperature with an oven thermometer. I always say: don’t be afraid to test a cupcake or two before frosting, just to be sure.
Cooking Tips & Techniques
- Get the cocoa just right: Black cocoa is potent stuff—a little goes a long way. If you’ve never baked with it, start with less and bump up to taste. Too much can be bitter, but just enough gives that true “velvet” look.
- Don’t overmix the batter: It’s tempting to beat until perfectly smooth, but cupcakes love a light hand. Overmixing = dense, tough crumb. I’ve had to learn that lesson more than once!
- Use room temperature ingredients: Eggs, buttermilk, and butter should all be at room temp for best blending. Cold ingredients can cause the batter to seize up or bake unevenly.
- Hot water or coffee makes a difference: This step “blooms” the cocoa, giving a fuller flavor and smoother texture. Coffee deepens the chocolate taste, but water works fine if you don’t want a hint of mocha.
- Fill cupcake liners evenly: Uneven filling leads to wonky cupcakes—use a large cookie scoop or measuring cup for consistent results.
- Watch the bake time: These cupcakes go from perfect to dry in a couple of minutes. Start checking at the 17-minute mark. If your oven runs hot, shave off a minute or two.
- Test with a toothpick: You want a few crumbs, not a clean pick. Overbaking dries them out, but underbaking leads to sunken middles.
- Cool completely before frosting: Even a hint of warmth will melt the frosting and make a mess. Trust me—I’ve rushed and regretted it.
- For super-smooth frosting: Sift your powdered sugar and cocoa before mixing. Lumps are a pain to fix later.
And don’t worry if your first batch isn’t bakery-perfect—cupcakes are forgiving, and practice makes perfect. If your frosting splits, a splash of extra milk and a longer beat usually brings it back together. Multi-task by prepping your frosting while cupcakes bake. Don’t toss any “ugly” cupcakes—those are the baker’s treat!
Variations & Adaptations
- Gluten-Free Black Velvet Cupcakes: Swap the all-purpose flour for a 1-to-1 gluten-free blend (like King Arthur Measure for Measure). I’ve tried this swap and the cupcakes stayed moist and fluffy—no one noticed the difference!
- Dairy-Free Version: Use unsweetened almond or soy milk soured with lemon juice in place of buttermilk, and dairy-free butter and cream cheese for the frosting. Just be sure to use a neutral-tasting oil.
- Red Velvet Twist: Add 1-2 tsp red gel food coloring to the batter for a deep maroon shade—super fun for holiday parties.
- Spiced Black Velvet: Stir 1/2 tsp ground cinnamon and a pinch of cayenne into the dry mix for a Mexican chocolate vibe (I love this one for winter gatherings!).
- Mini Cupcakes: Divide the batter into a 24-cup mini muffin tin and bake for 10-12 minutes. Great for parties or kids’ snacks.
- Allergen swaps: For egg-free, use two flax eggs (2 tbsp flaxseed meal + 5 tbsp water, mixed and rested).
Honestly, my favorite twist is to stuff the centers with a dollop of raspberry jam before baking—totally next level! You can even swap the frosting for a marshmallow fluff or whipped ganache. The base is super versatile, so make it your own!
Serving & Storage Suggestions
These black velvet cupcakes are best served at room temperature—the flavor is deeper and the crumb is softer. For a dramatic presentation, sprinkle with edible glitter, black sanding sugar, or a swirl of colored frosting on top. If you’re going all-out, I love serving them on a dark platter with a few fresh berries or a glass of cold milk (or a bold espresso for grown-ups!).
Store frosted cupcakes in an airtight container at room temperature for up to two days, or in the fridge for up to five days (bring to room temp before eating for best texture). Unfrosted cupcakes freeze beautifully—wrap tightly in plastic and store up to two months. Just thaw at room temp and frost as usual. To reheat, pop a cupcake in the microwave for 10 seconds (no longer, or the frosting may melt). The flavor actually deepens after a day or two, so don’t be afraid to make ahead for parties—just keep them covered to prevent drying out.
Nutritional Information & Benefits
Each black velvet cupcake (with frosting) contains approximately 240 calories, 4g protein, 10g fat, and 35g carbs. Black cocoa and Dutch-processed cocoa provide a dose of antioxidants, while using oil and buttermilk keeps the fat content balanced and the crumb moist without heaviness. If you go gluten- or dairy-free, the nutrition profile shifts only slightly.
There are potential allergens to note: eggs, dairy, and wheat. For those watching sugar, you can reduce the sugar slightly or use a sugar substitute in the batter (though the texture may change a bit). I love that these cupcakes fit into special diets with a few simple swaps—great for making everyone at the table feel included!
Conclusion
So, why make these irresistible moist black velvet cupcakes? For me, it’s about the wow factor—both in looks and taste. They’re easy enough for a beginner, dramatic enough to steal the show at any party, and just plain delicious. Plus, you can tweak them to fit almost any dietary need or flavor craving.
I can’t count how many times these cupcakes have saved my dessert table. Whether you’re baking for a crowd or just want a treat all to yourself, give this recipe a try and make it your own. I’d love to hear how you put your spin on them—leave a comment below with your favorite variation or share a photo on social media. Happy baking, and may all your desserts be a little dramatic and a lot delicious!
Frequently Asked Questions
What makes black velvet cupcakes different from chocolate cupcakes?
Black velvet cupcakes use black cocoa powder, which gives them a deeper color and a more intense, smooth chocolate flavor compared to regular chocolate cupcakes. The buttermilk and oil also make them extra moist and tender.
Can I make black velvet cupcakes without black cocoa?
Yes, you can use all Dutch-processed cocoa, but the cupcakes won’t be as dark. The flavor will still be rich and delicious, just not as dramatic in appearance.
How do I store black velvet cupcakes?
Store frosted cupcakes in an airtight container at room temperature for up to 2 days or in the fridge for up to 5 days. For longer storage, freeze unfrosted cupcakes for up to 2 months and thaw before frosting.
Can I make these cupcakes gluten-free or dairy-free?
Absolutely! Swap the flour for a 1-to-1 gluten-free blend and use plant-based milk soured with lemon juice for buttermilk. Use vegan butter and cream cheese for the frosting if needed.
Why are my cupcakes dry or sunken in the middle?
Dry cupcakes usually mean they’re overbaked or there wasn’t enough moisture. Sunken centers can be caused by underbaking or overmixing the batter. Always check your oven temperature and don’t overmix for best results.
Pin This Recipe!
Black Velvet Cupcakes
- Total Time: 35 minutes
- Yield: 12 cupcakes 1x
Description
These black velvet cupcakes are strikingly dark, ultra-moist, and rich, thanks to a blend of black cocoa and Dutch-processed cocoa. Perfect for parties or whenever you want a dramatic, crowd-pleasing dessert that’s easy to make.
Ingredients
- 1 cup (125g) all-purpose flour
- 1/3 cup (30g) black cocoa powder
- 2 tablespoons (15g) Dutch-processed cocoa powder
- 1 cup (200g) granulated sugar
- 1 teaspoon (4g) baking powder
- 1/2 teaspoon (2g) baking soda
- 1/2 teaspoon (3g) salt
- 1/2 cup (120ml) buttermilk, room temperature
- 1/3 cup (80ml) vegetable oil
- 2 large eggs, room temperature
- 2 teaspoons (10ml) pure vanilla extract
- 1/2 cup (120ml) hot water or hot brewed coffee
- For the frosting:
- 1/2 cup (115g) unsalted butter, softened
- 4 ounces (113g) cream cheese, softened (optional)
- 2 to 2.5 cups (240-300g) powdered sugar, sifted
- 1 to 2 tablespoons (8g) black cocoa powder (optional, for color and flavor)
- 1 to 2 tablespoons (15-30ml) milk or heavy cream, as needed
- 1 teaspoon vanilla extract
- Pinch of salt (optional)
Instructions
- Preheat oven to 350°F (175°C). Line a standard 12-cup muffin tin with cupcake liners.
- In a large bowl, whisk together flour, black cocoa powder, Dutch-processed cocoa powder, granulated sugar, baking powder, baking soda, and salt until well combined and no lumps remain.
- In another bowl, whisk together buttermilk, vegetable oil, eggs, and vanilla extract until smooth.
- Pour the wet ingredients into the dry ingredients and stir gently with a spatula until just combined. Do not overmix.
- Add hot water or hot brewed coffee and stir gently until the batter is smooth and glossy.
- Divide the batter evenly among the 12 cupcake liners, filling each about 2/3 full.
- Bake for 17-20 minutes, or until a toothpick inserted in the center comes out with a few moist crumbs.
- Let cupcakes cool in the pan for 5 minutes, then transfer to a wire rack to cool completely before frosting.
- For the frosting: Beat softened butter (and cream cheese, if using) until creamy. Gradually add powdered sugar and black cocoa powder (if using), beating until fluffy.
- Add milk or cream as needed for smoothness, then beat in vanilla and a pinch of salt.
- Frost cooled cupcakes generously using a piping bag or spatula. Decorate as desired.
Notes
For best results, use both black cocoa and Dutch-processed cocoa for color and flavor. Do not overmix the batter to keep cupcakes tender. Use room temperature ingredients for even blending. Coffee deepens the chocolate flavor but can be replaced with hot water. Cupcakes can be made gluten-free or dairy-free with simple swaps. Store frosted cupcakes at room temperature for up to 2 days or in the fridge for up to 5 days.
- Prep Time: 15 minutes
- Cook Time: 20 minutes
- Category: Dessert
- Cuisine: American
Nutrition
- Serving Size: 1 cupcake
- Calories: 240
- Sugar: 22
- Sodium: 220
- Fat: 10
- Saturated Fat: 5
- Carbohydrates: 35
- Fiber: 2
- Protein: 4
Keywords: black velvet cupcakes, black cocoa, chocolate cupcakes, party dessert, Halloween cupcakes, moist cupcakes, easy cupcakes, cream cheese frosting, dramatic dessert